
Cane making is fun and it gives you a good feeling knowing that it will be used to help someone in need. If you scroll down the page you will see how I make the canes from the finished cane you see above to the beginning of the process.
Here it is:
I usually sand it and re-coat it with Minwax clear satin acrylic finish. I let it dry overnight then resand it and re-coat it in the finishing process, at least three times.
 This is a handle I am working on that is more of a stylized piece. I didn't carve any animal faces into it. Black Walnut- $125.00)
 I use this draw knife to shave the bark and cambium layer off the stick. Then I make sure it is tapered down to a narrow tip, small enough at the bottom to fit into a rubber cap. This is an old draw knife I picked up at a garage sale for 3.00. I had to sharpen it on a grinder, and now it is razor sharp! Good old carbon steel.
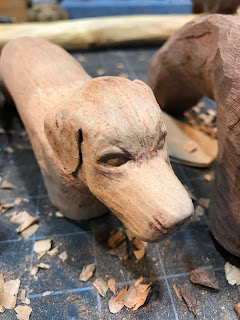
 I rough cut the handle shape on a band saw before attaching it to the cane shaft. Then I draw an animal on the front and carve it into the handle.

I use a craftsman 1" hole cutter to make a cut into the cane shaft. This cutter makes a nice clean space for the aluminum reinforcement tube that I will add later on. The cane needs to light weight yet strong, especially where a force will be pressed on the handle.

This is the hole after using the hole cutter. The outside edge will be this but remains strong after assembling the can, aluminum shaft and handle with another hole cut.

This is the handle with the hole cut into it. I used black walnut for the handle. It carves nice and clean and leaves a beautiful finish.

I have inserted the shaft of aluminum into the handle and am ready to glue it to the cane with some 30 min epoxy. I used an old tent pole for the reinforcing shaftand a 3/8" steel rod. It is 5 inches in length and the diameter is 1". This creates a really strong joint.
 Now that the rod is set up good, I glue it to the handle making sure there is epoxy on all the inside edges of the joint. I twist the stick into the handle so that the aluminum tube is completely hidden inside the joint. This is all done before gluing to make sure everything fits snug. Sometimes I have to do some sanding to get a good, tight joint.
 I drilled out the center and will add a steel, 1/4" rod for extra strength in the joint.

After an hour the cane and handle are set up pretty good. The joint is very strong and still the same diameter as the cane. I can begin carving the handle now.

 This is a handle I am working on that is more of a stylized piece. I didn't carve any animal faces into it. Black Walnut- $125.00)
 I use this draw knife to shave the bark and cambium layer off the stick. Then I make sure it is tapered down to a narrow tip, small enough at the bottom to fit into a rubber cap. This is an old draw knife I picked up at a garage sale for 3.00. I had to sharpen it on a grinder, and now it is razor sharp! Good old carbon steel.
 I rough cut the handle shape on a band saw before attaching it to the cane shaft. Then I draw an animal on the front and carve it into the handle.
I use a craftsman 1" hole cutter to make a cut into the cane shaft. This cutter makes a nice clean space for the aluminum reinforcement tube that I will add later on. The cane needs to light weight yet strong, especially where a force will be pressed on the handle.

This is the hole after using the hole cutter. The outside edge will be this but remains strong after assembling the can, aluminum shaft and handle with another hole cut.

This is the handle with the hole cut into it. I used black walnut for the handle. It carves nice and clean and leaves a beautiful finish.

I have inserted the shaft of aluminum into the handle and am ready to glue it to the cane with some 30 min epoxy. I used an old tent pole for the reinforcing shaftand a 3/8" steel rod. It is 5 inches in length and the diameter is 1". This creates a really strong joint.
 Now that the rod is set up good, I glue it to the handle making sure there is epoxy on all the inside edges of the joint. I twist the stick into the handle so that the aluminum tube is completely hidden inside the joint. This is all done before gluing to make sure everything fits snug. Sometimes I have to do some sanding to get a good, tight joint.
The steel rod has been glued into place. I will let it set up for an hour to make sure it is good and secure.

After an hour the cane and handle are set up pretty good. The joint is very strong and still the same diameter as the cane. I can begin carving the handle now.

This cane features a dire wolf from the Game Of Thrones series.
(Black Walnut-$185.00)


 Taking shape!
 Draw knife to shape the stick.

 (Cherry-170.00) (Walnut- 170.00)


(Black Walnut-$185.00)


1 comment:
This is really interesting Jim. I like the lion head cane a lot. I never knew how you attached the top or if it was one piece.
Post a Comment